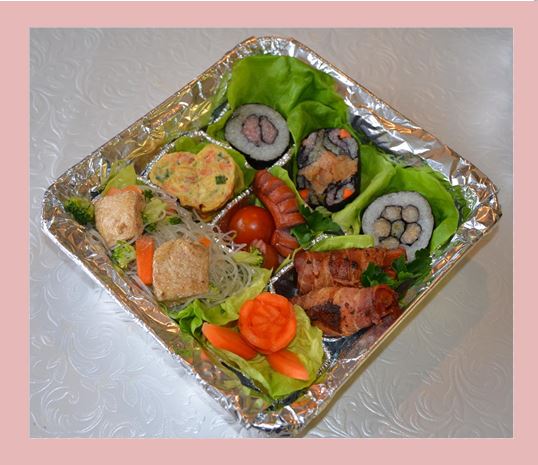
söndag 6 mars 2016

Japaneese Bento Boxes


Bento Box, really means a lunch box. However it has ancient tradition and history in Japan. The boxes in themselves are beautiful creations made from wood to the more modern one´s out of plastic. I don´t have any of the beautiuful boxes, but I tried to make the content. Here I have made one Bento Box for grown ups and one childrens Bento Box. What you put in the box could be anything of your own liking.

In Japan the content of the Bento Boxes is an artistic creation in itself. In my Bento Box for grown ups I have made mosaic sushi, heart shaped egg omelette, sausage, vegetable and beef teriyaki rolls, asian glasnoodlesallad and carved carrot roses.

In my childrens box I have made cats out of rice. Octopus sausages, muschroom from tomato and egg, ham and carved carrots.

Here are the links to the recipes and instructions for each dish.

Mosaic Sushi


Vegetable and beef teriyaki rolls


Glasnoodlesallad


Heartshaped egg omelette


Octopus sausage and carved carrot roses


Octupus sausages, colored rice and carved carrots for the Japaneese Bento Box

Decorative food for the Bento Box


Colored rice
 For the childrens Bento Box boil sticky rice according to the instructions on the package. To color, boil carrots and mash for the orange. To make the yellow rice hardboil an egg and mix the yolk with the rice.

Mushroom
To make the mushroom cut a baby tomatoe in half. Use boiled egg to make the foot of the mushroom. To make the white spots on the mushroom cut out small rounds with a straw from eggwhite or cheese.


Octopus sausages
Cut the end of the sausage with eight cuts. Put the sausages in hot boiling water or in a frying pan and they will curl up. Dampen springonions and use the green to make a band around the octopus.

Carve carrots
To carve carrots cut slices of fresh carrots and carve out any shape you like.


Carved carrot rose
Cut the end of a carrot to carve out your rose. To make rosepetals start from the bottom and work your way up doing the top last.

Curly sausages

To make curly sausage cut the sausage with small cuts but not all the way through. Heat the sausages in the frying pan or hot boiling water and they will curl up.

Heart shaped egg omelette


Heart shaped egg omelette

2 eggs
1 tsp rice wine(mirin)
1 tbsp sugar
1 pinch of salt

Mix ingredients

Heat frying pan
Grease with a little oil

Pour a thin layer of eggs on the pan.
Start to roll up the omelette from the top towards you.
When rolled up move the roll to the top of the pan and add more omelette mix thinly to the frying pan, connecting with the previous roll. Start rolling the omelette towards you again and repeat until all egg mix is used.
Move the omelette roll to a cutting bord.
Cut evenly pieces.

Place the pieces so you see the layers up on top and make a 45 degree angle cut. Then turn one of the pieces to make a heart when placed together.

Put them together like a heart. Dip in a little egg mix and put back on the frying pan. This will make the two halves stick together. With a teaspoon put a little egg mix in the middle on top to close the gap. Remove the egg from the pan and dip the upper part in egg mix and put it back on the pan for a few seconds to seal the other side.

Now you should have beautiful heart shaped eggs.


Asian glasnoodlesallad with tofu


Asian glasnoodlesallad with tofu

Tofu
500 grams of tofu
1 clove (s) Garlic (s), pressed
2 tablespoons canola oil
1 tablespoon soy sauce
1 teaspoon honey
0.5 tablespoons balsamic vinegar
1 tablespoon canola oil, for frying

Glasnoodlesallad
1 pack glass noodles
0.5 st broccoli or cauliflower
250 grams of carrots
0.5 st cucumber
0.5 pc leeks (s)
0.5 pc lettuce
0,5 pot (s) coriander
0,5 pot (s), mint
100 grams of cashew nuts, salted

Dressing
1 clove (s) Garlic (s)
1 tbsp ginger, grated
0.5 piece chilie
2 tablespoons canola oil
1 teaspoon sesame oil
2 tablespoons soy sauce
1 teaspoon honey
0.5 lime (s), the juice


Directions for cooking

Tofu:
Cut the tofu into pieces. Mix together the garlic, oil, soy sauce, balsamic vinegar and honey in a bowl and pour the marinade in a plastic bag. Add the tofu pieces into the marinade and let them marinate for about 10 minutes.

Glasnoodlesallad:
Prepare the noodles according to the package instructions. Rinse them, then cold.
Wash and cut the broccoli/cauliflower into small florets. Peel and shred carrots. Rinse the cucumber, remove the watery part and cut the cucumber into strips. Rinse and slice leek and lettuce. Wash and finely chop the cilantro and mint. Mix everything together in a bowl.

Dressing:
Peel and grate the garlic and ginger. Rinse, seed and finely chop chilies. Mix in a bowl with oil, sesame oil, soy, honey and lime juice. Add the dressing to the noodlesallad and mix thoroughly.

Tofu:
Remove the tofu pieces from the marinade. Heat a little oil in a pan and fry the tofu pieces golden.
Serve glasnoodlesallad with the fried tofu and cashew nuts at the top.


Vegetable Teriyaki Beef Rolls


Vegetable Teriyaki Beef Rolls

Ingredients:
8 thin slices of beef
16 strips of pumpkin
16 strips of carrot
16 strips of spring onion 
salt and cracked black pepper
starch
sesame oil

Seasoning for the vegetables
1 tsp. soy sauce
1 tsp. mirin (sweet sake)

Teriyaki sauce
1 tbsp. sake
1 tbsp. mirin (sweet sake)
1 tbsp. soy sauce
1 tbsp. ketchup
1 tsp. sugar
1 tsp. Gochujang (Korean red chili paste)


Directions:
1. Cut pumpkin and carrots into sticks.
2. Season  with soy sauce and mirin mix.
3. Place pumpkin sticks and carrot strips on a microwavable dish, cover, and cook in the microwave for 3 minutes (500w). 
4. Place the slices of beef so that the length of it is running flat and vertically towards you. Sprinkle a bit of salt and cracked black pepper, sprinkle starch (onto one side) and place the seasoned vegetable strips and spring onion strips on the end of the beef close to you and start rolling.
5. Heat sesame oil in a frying pan, place the rolls seam side down, cover, and steam on low heat for about 5 minutes. Then flip the rolls so that all sides are cooked equally.
6. Add the teriyaki sauce and cook on high heat until thick and glossy. 

fredag 4 mars 2016

Mosaic Sushi


Mosaic Sushi


I have been enjoying myself making mosaic sushi. I even carved carrots to roses and leaves. Here is the recipe for making the sushi rice and also how to make the colors.  To color the rice I steamed carrots, broccoli, tomatoes and even mushrooms. Than mixing them one and one to a smooth paste. After I made the sushi rice I divided the sushi rice in different bowls and added the colors to the rice. For this I only had carrot sticks, fishsticks marinaded in soy sauce and colored rice.

To make the mosaic just use your creativity and imagination.

Ingredients needed in addition to the ingredients for the rice are carrots, nori-sheets and your choice of fish or other fillings you like. You could use salmon, tuna, shrimps or anything you like. I just used what I had this evening which was some homemade fishcakes from cod that I cut in sticks.


Preparing  Sushi  Rice  

Instructions:

Step 1: Wash the rice
Start by measuring out  the  rice. You want to cook about 80 grams of uncooked sushi rice per sushi roll.

Place  the  rice in a washing bowl then wash thoroughly with cold water using your  hands to rub the rice together making it release any excess starch, keep washing the  rice till the  water runs clear, this should take 5-7 washes.

Step 2: Cooking Sushi Rice
Place  the  rice in a sieve  to let the  water from the  washing drain out,  then place the  rice in a rice cooker or a pan with a lid.

Add 150 % water to your 100 % rice, so for 100 grams of rice you add 150 ml of water. If you have a rice cooker, close the  rice cooker then start it, once the  rice cooker stops cooking leave  the  rice in the  cooker with the  lid closed for another 10 min, at no point during the cooking should you remove the rice cookers lid.

If you cook in a pan like me, put the lid on and let it cook until the water is absorbed. Don´t burn. Add some little extra water if necessary. Keep the lid on and as you remove the pan from the stove to cool.

Step 3: Seasoning the Sushi Rice
Place  your  cooked sushi rice in a large  bowl. Traditionally a large  wooden bowl known as a  “Hangiri” or “Oke” is used, the  wood of the  Hangiri  helps absorbe excess rice vinegar always giving you perfectly seasoned sushi rice. If you don’t have a hangiri you can use  a large  plastic container. Make shore its very large  and shallow preferably with a flat bottom. 

Now you want to add “Sushi rice vinegar” this will season your  rice, making it taste delicious. You can either make your  own, using the  recipe below or you can buy ready made Sushi  rice vinegar. 

You want to add 15 ml  per  100 g cooked sushi rice, for this just assume that the  uncooked rice has doubled in weight, don’t go trying  to weigh  the  hot  rice. It`s best to add the  sushi rice vinegar as fast as possible so that the  mixture can be absorbed by the  hot  rice. It is essential to use  a spatula when pouring the mixture to evenly  cover  all the  rice so that you don’t  have  patches of strong taste and other spots with non at all.

Sushi Rice Vinegar Recipe Mix
9 Tbsp  Rice Vinegar
3 Tbsp  Sugar
1 Tbsp  Mirin (sweet sake)
Tbsp  Salt

Once  mixed heat the  mixture to the  point just before boiling,  then let it rest. After adding the mixture you want to start separating the  individual rice grains while gently mixing them around so they  all get a chance to absurd the  sushi rice vinegar.

Once  the  sushi rice is seasoned you want to cool it down to body  temperature, just remember to turn the  rice over  to cool it down uniformly.

Step 5: Storing
Its best to use  the  rice straight away  but  in any case you will want to move the  rice to a large bowl and then cover  with a damp towel,  this is done to prevent the  top  layer  of rice drying  out.

How long  can you  store the sushi rice? in my experience sushi rice is like pasta you really don’t want to eat  old pasta, none the  less  you can still make sushi roll with it up to 8 hours after making it, as long as you stored in a warm environment like for example a rice cooker on the keep warm setting.